How to Run a Web Application Scan
This is the complete walkthrough, from registering an application to launching the scan and reading the result. A web scan is configured through a six-step wizard that opens as its own closable tab — you can leave it half-finished, go record a browser session or add an auth profile, and come back without losing your place.
Before you start: only scan applications you own or have written permission to test. An active DAST scan sends real attack payloads and can create, modify or delete data. Point it at a staging environment first.
The six steps at a glance
- Target — which application, and which of its hosts are in scope
- Discovery — how the scanner finds URLs to test
- Auth — credentials, so the scanner gets past the login page
- Policy — which checks run, and how hard they hit
- Schedule — run now, or on a recurring schedule
- Review — confirm and launch
Create the application
Everything in Vooki Pro hangs off an application — a saved scan target. Open Applications from the sidebar and click New application. The list shows every target you have registered, with a severity summary, a scan count and per-row Scan / Edit actions.
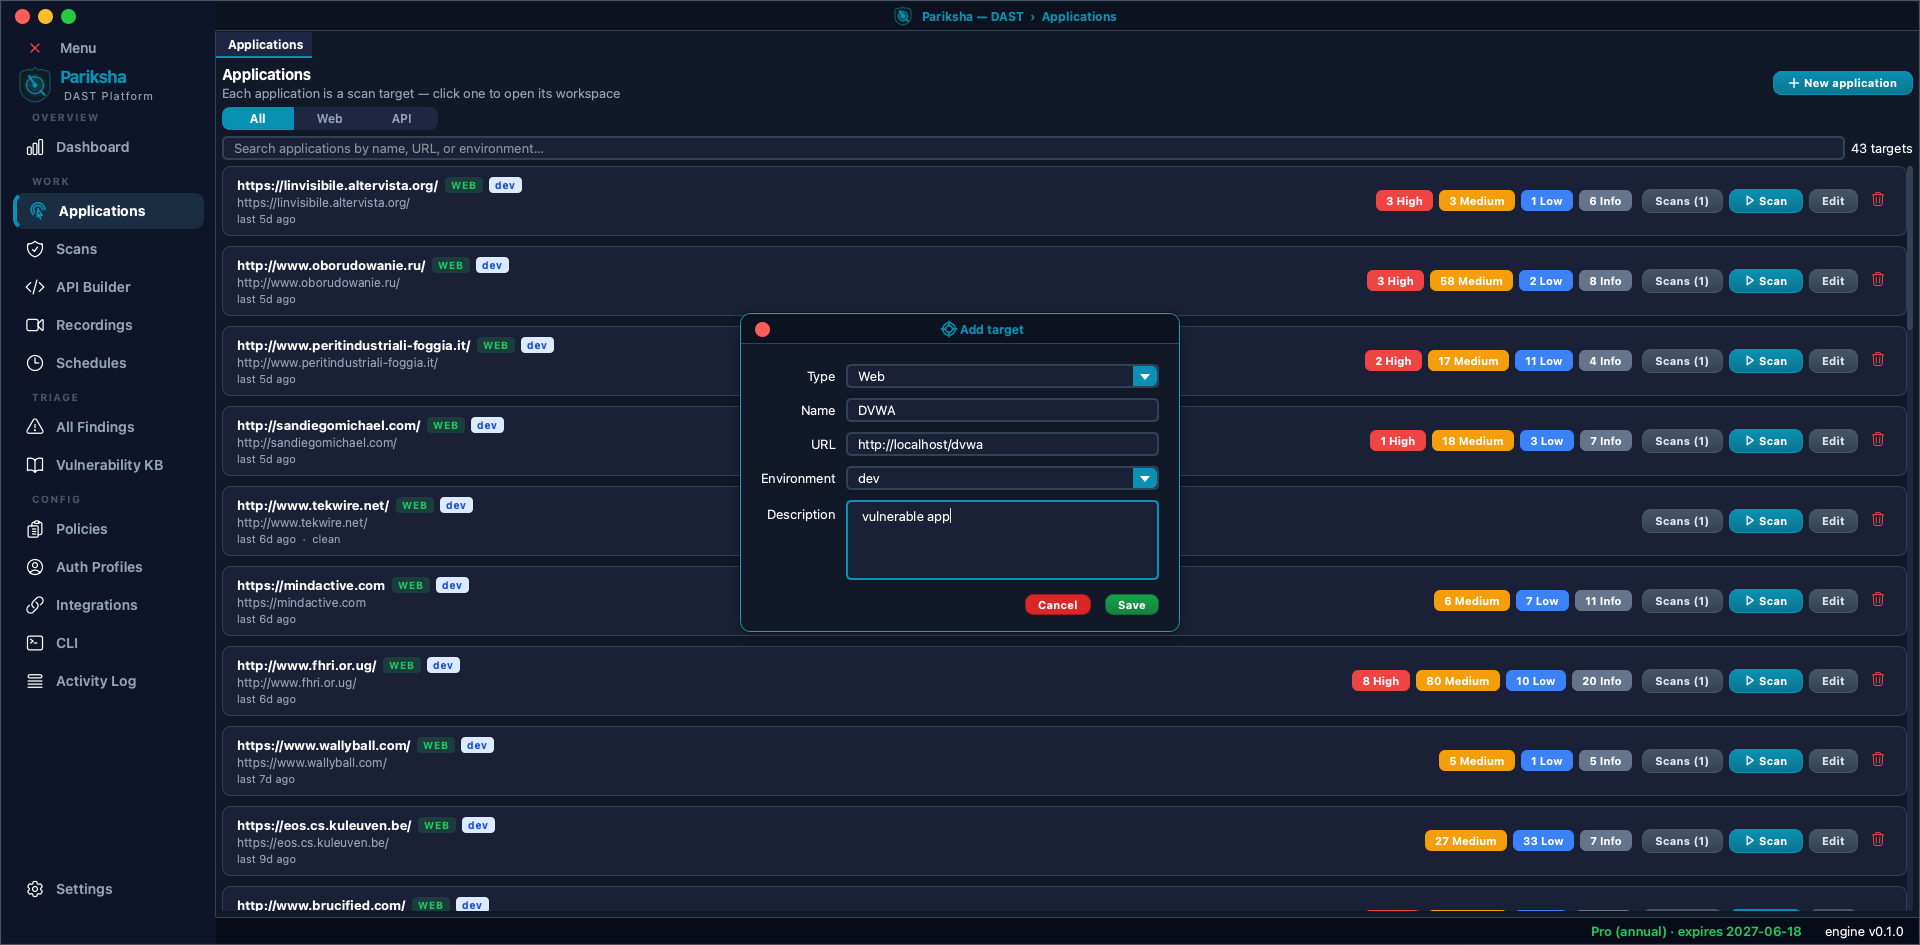
The dialog asks for:
- Type — Web or API. This decides which wizard opens when you scan. Pick Web for anything you browse; pick API for a REST service you will drive from an OpenAPI spec, Postman collection or HAR file.
- Name — a human label, e.g.
Acme staging. This is what appears in scan lists and on reports. - URL — the base URL the scanner starts from, e.g.
https://staging.example.com. - Environment —
dev,stagingorprod. Colour-coded throughout the app so a production target is never mistaken for a sandbox. - Description — optional notes, carried into the application overview.
Click Save, then Scan on the new row. The scan wizard opens in a new tab.
You can skip this step and paste a URL straight into the wizard for a one-off test. Save an application instead if you will scan it more than once - every scan, finding and report then collects in one workspace you can open from the Applications list.
Step 1 — Target and host scope
The first wizard step answers where do you want to scan? Pick the saved target from the dropdown, or type a URL directly. Edit Target jumps back into the application's settings if you need to change something.
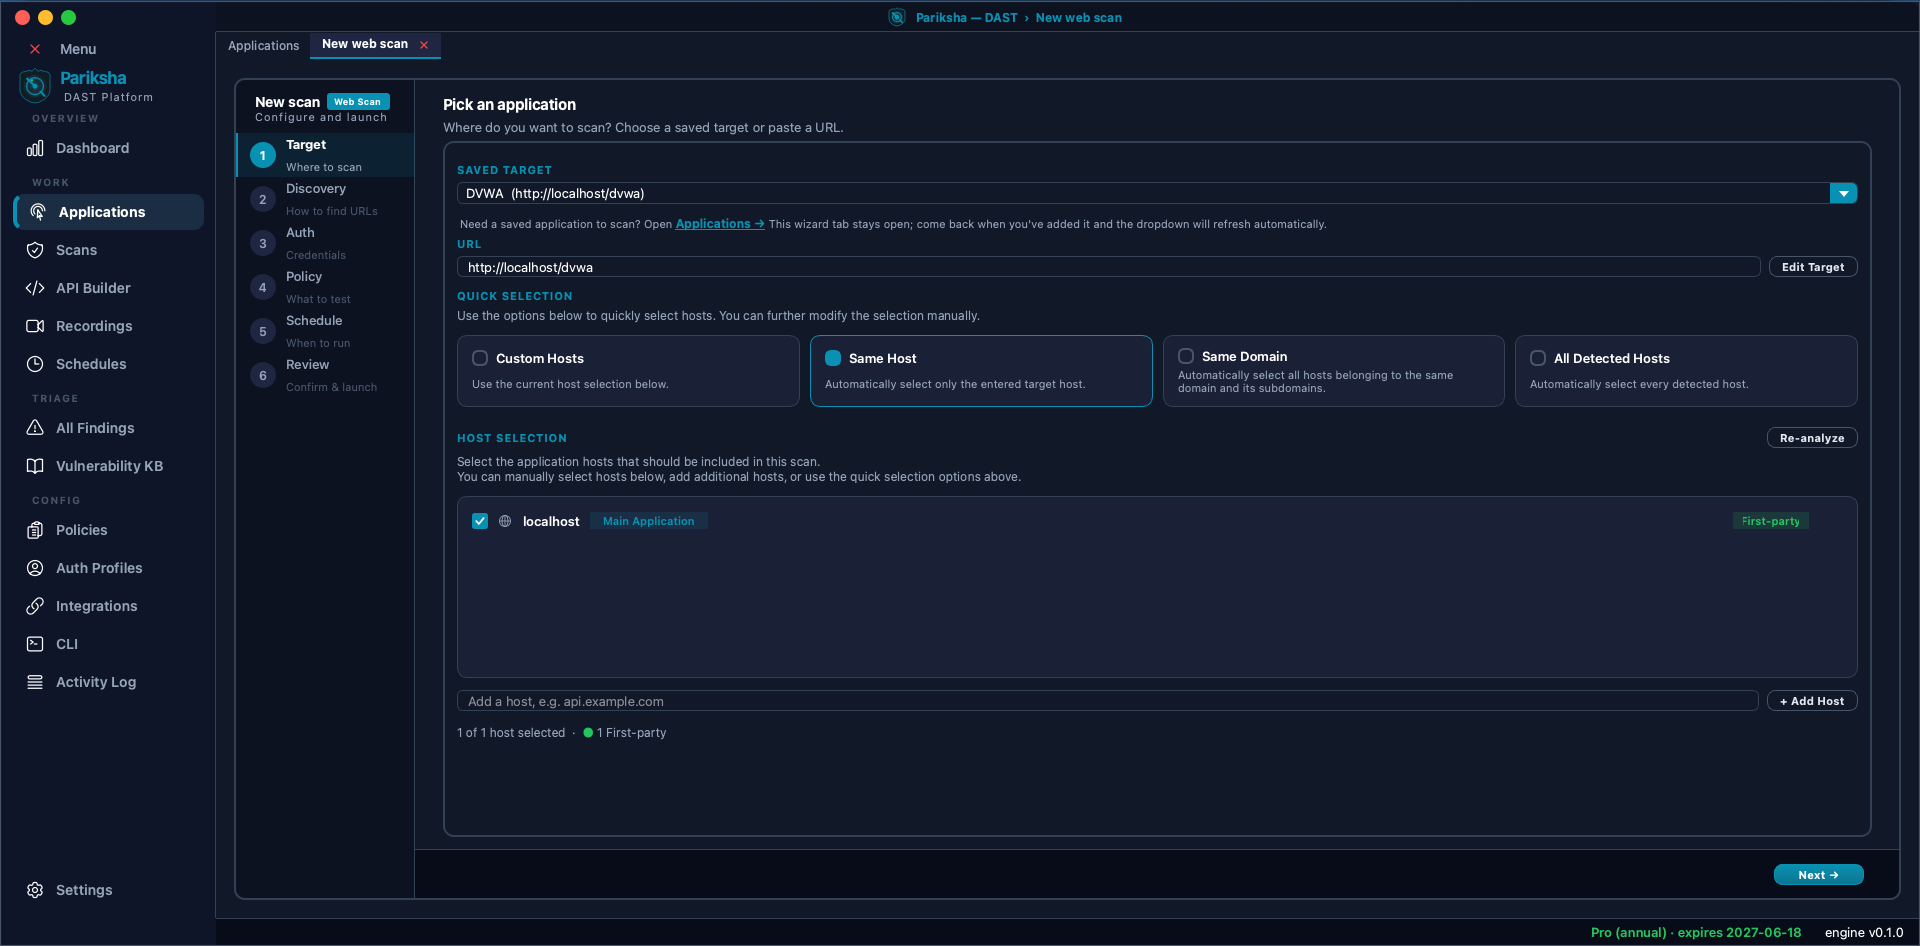
Quick selection
Four presets decide which hosts the scan is allowed to touch:
- Custom Hosts — use whatever you have ticked in the list below.
- Same Host — only the exact host you entered. The safe default.
- Same Domain — that domain and its subdomains.
- All Detected Hosts — every host discovered, including third parties.
Host selection
Modern applications fan out across many hosts. Rather than making you remember them, Vooki Pro loads the start URL once in a headless browser, records every host the page talked to, and classifies each one — main application, API, authentication, static, CDN or third party. Hosts you own are badged First-party. This is a single page load, not a crawl: no clicks, no navigation, no payloads.
- Tick hosts individually to build a custom scope.
- Re-analyze runs the host discovery again — useful after the app changes.
- Add Host adds one manually, e.g.
api.example.com, when you know about a host the page load did not reach. - The counter underneath confirms what you selected, e.g. 1 of 1 host selected · 1 First-party.
Host scope is your safety rail. "All Detected Hosts" lets the scanner send payloads to third-party domains you do not own - analytics, CDNs, payment providers. That is very likely unauthorised testing. Stay on "Same Host" or "Same Domain" unless you have a specific, documented reason.
Step 2 — Discovery
Discovery decides which URLs the scanner will know about. A scanner can only test what it has found, so this step has more effect on your results than any other.
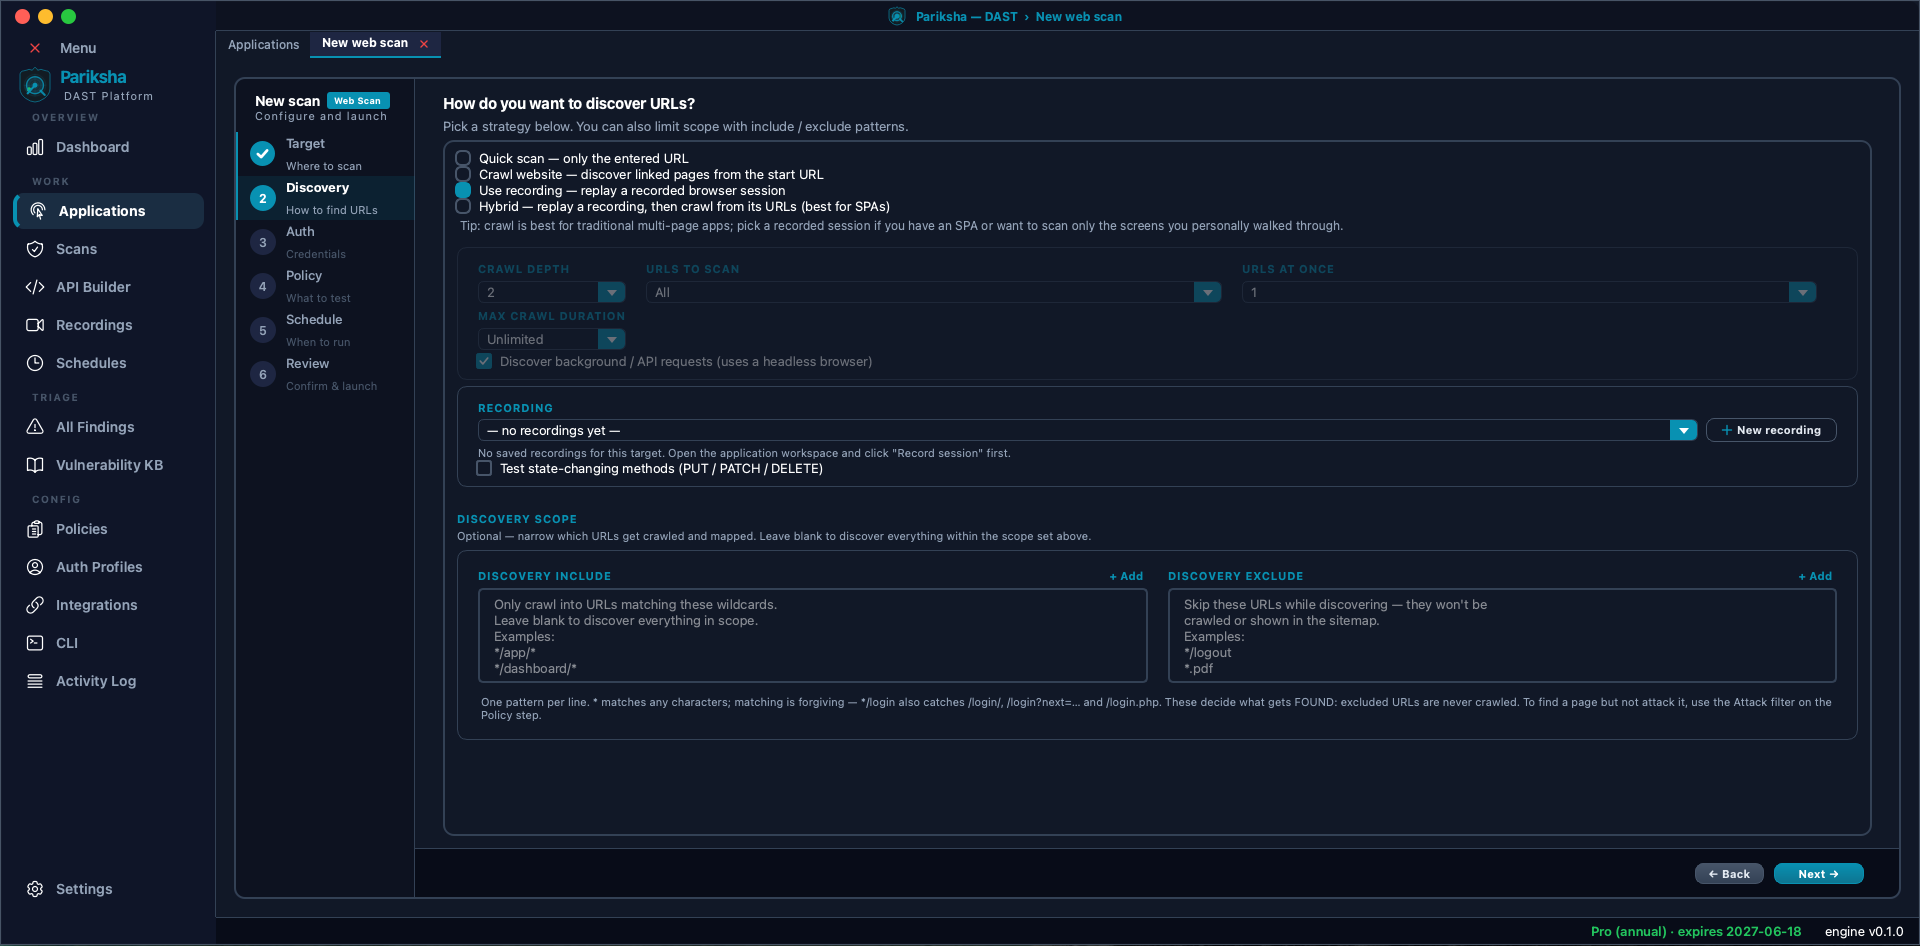
Four strategies
- Quick scan — only the URL you entered. Fastest; use it when you already know the exact endpoint you care about.
- Crawl website — follow links from the start URL. The usual choice for a traditional multi-page application.
- Use recording — replay a browser session you recorded, so the scanner walks exactly the screens you walked. Ideal when you only want to test a specific flow.
- Hybrid — replay a recording, then crawl outward from its URLs. The right choice for single-page applications, where a plain crawler sees almost nothing because the routes are built in JavaScript.
Crawl controls
- Crawl depth — 1 to 5 links deep. Default 2.
- URLs to scan — All, 50, 100, 150, or a custom cap.
- URLs at once — 1, 2, 3, 5 or 8 crawled URLs scanned concurrently. Default 1 (sequential). Higher is faster but puts more load on the target; each URL still uses the scan's own concurrency setting for its payloads.
- Max crawl duration — Unlimited, 1, 5, 15 or 30 minutes, or 1 hour. The scanner still tests whatever was discovered when the clock runs out.
- Discover background / API requests — runs a headless browser pass that
captures the XHR and
fetchcalls the page makes. A static crawler reads<a href>out of raw HTML and never executes your JavaScript, so it never sees your REST endpoints. This checkbox is what closes that gap. - Test state-changing methods — also test the
PUT,PATCHandDELETErequests in a recording. Off by default, because these can modify or destroy data.
Discovery scope
Two wildcard boxes, one pattern per line, narrow what gets crawled and mapped:
- Discovery include — only crawl into URLs matching these wildcards, e.g.
*/app/*. Leave blank to discover everything within the host scope. - Discovery exclude — skip these entirely, e.g.
*/logoutor*.pdf. Excluded URLs are never crawled and never appear in the sitemap.
Matching is forgiving: */login also catches /login/,
/login?next=… and /login.php.
Discovery filters decide what gets FOUND. Attack filters, on the Policy step, decide what gets ATTACKED. To map a page but never fire payloads at it, leave it in discovery and exclude it under Attack Scope instead.
Step 3 — Authentication
Optional, but almost always worth it. An unauthenticated scan reaches the login page and very little else, so the bulk of your application goes untested.
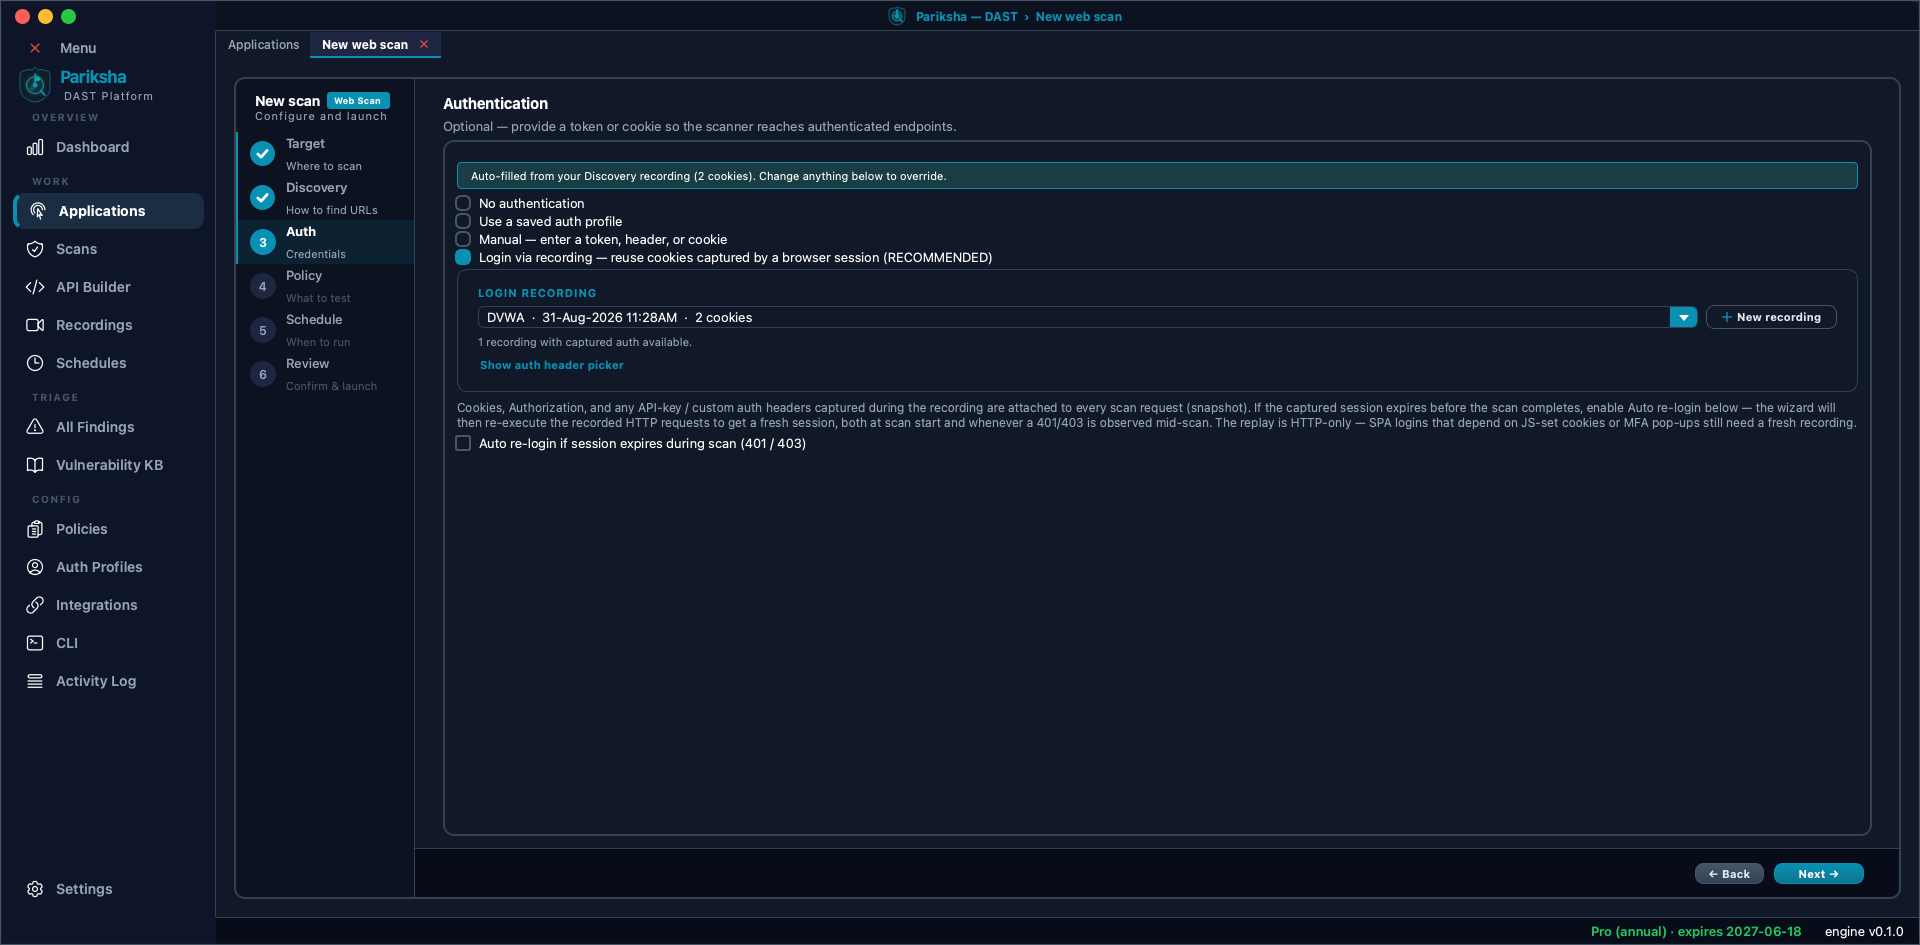
- No authentication — scan anonymously. The scanner will only reach unauthenticated endpoints.
- Use a saved auth profile — pick a stored credential set. Vooki Pro supports bearer token, basic auth, API key header, cookie, form login and OAuth2 client credentials. See Auth Profiles.
- Manual — paste a token, header or cookie for a one-off run, without saving anything.
- Login via recording (recommended) — reuse the cookies captured while you logged in yourself in a real browser. This is the route that works for SSO and other logins a script cannot drive. See Browser Recordings.
If you picked a recording on the Discovery step, this page auto-fills from it and says so — "Auto-filled from your Discovery recording (2 cookies)". Anything you change below overrides it. Show auth header picker lets you choose exactly which captured headers are attached.
Cookies, Authorization and any API-key or custom auth headers captured during the
recording are attached to every scan request as a snapshot. Auto re-login if session expires
during scan (401 / 403) re-executes the recorded HTTP requests to get a fresh session, both
at scan start and whenever a 401 or 403 appears mid-scan. Worth enabling on long scans against apps
with short session timeouts — without it, everything after the timeout silently tests as logged
out.
The replay is HTTP-only. A single-page app whose login depends on cookies set by JavaScript, or on an MFA pop-up, cannot be re-driven this way - those still need a fresh recording when the session expires.
Step 4 — Policy
The policy decides what gets tested and how hard.
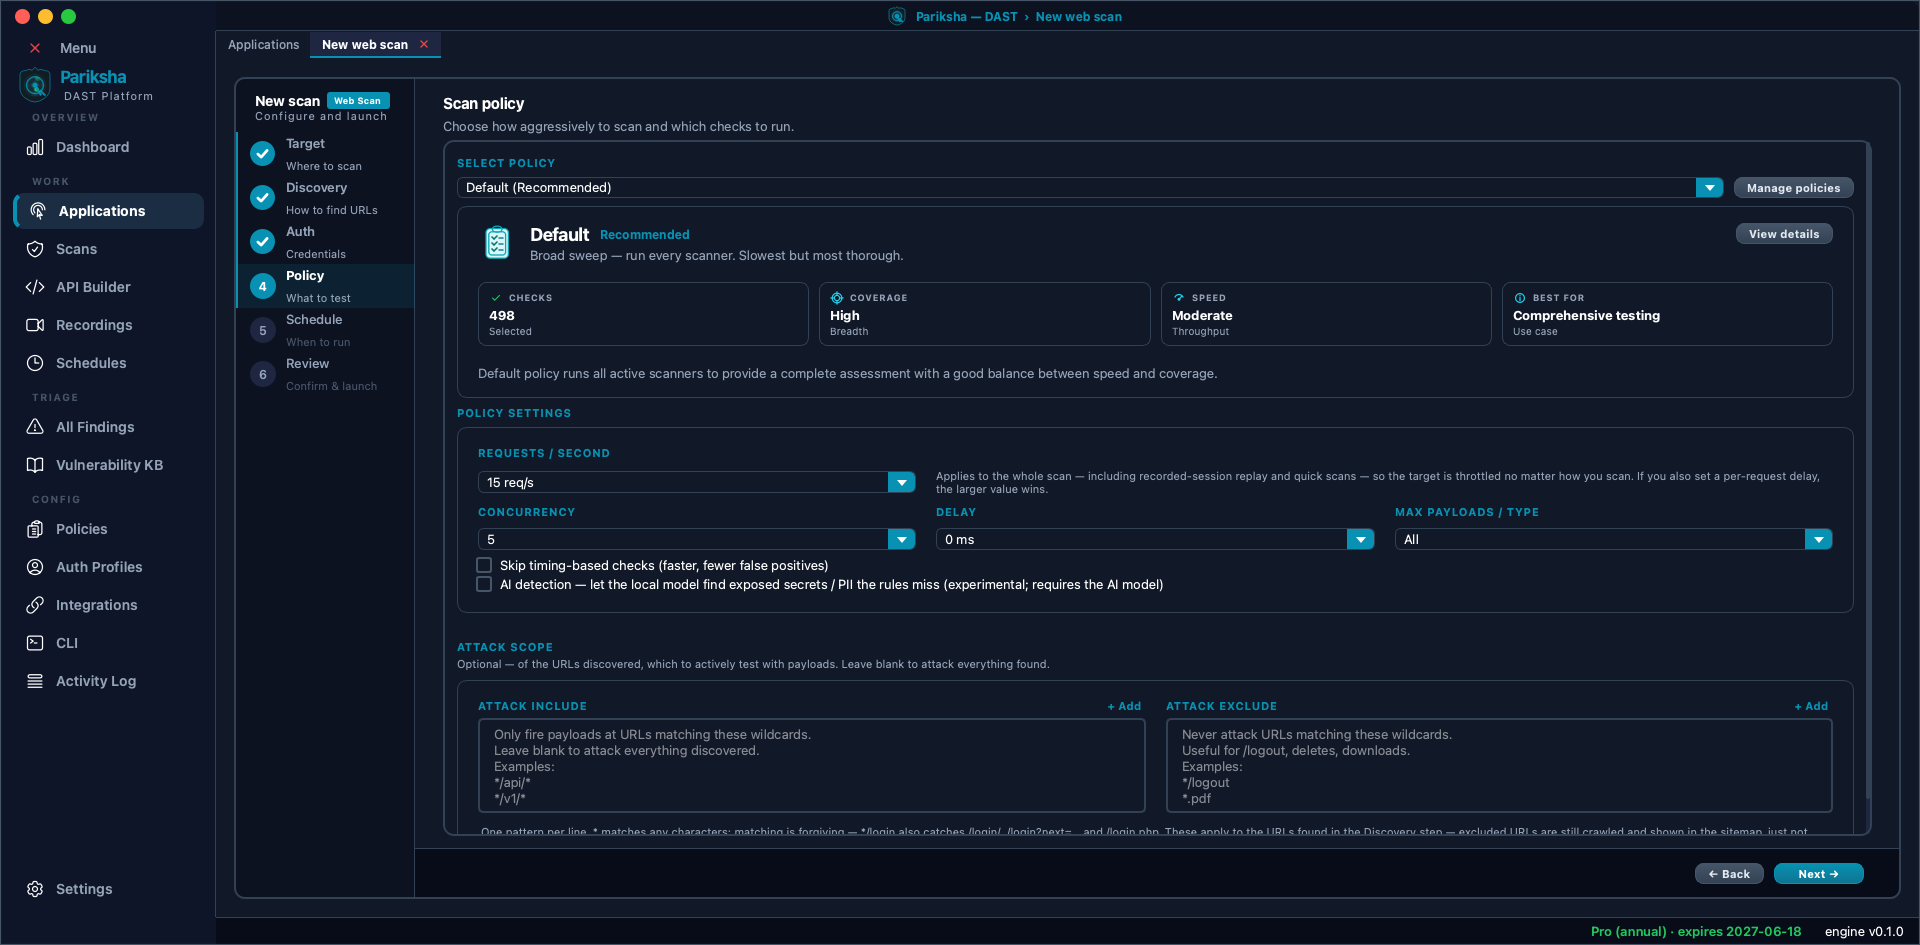
Choosing a policy
Pick from the dropdown; Manage policies opens the policy editor, and View details lists exactly which checks the selection runs. Six policies ship built in:
- Default (recommended) — every scanner. Slowest, most thorough.
- Quick — security headers and version fingerprinting only. A fast surface scan.
- Standard — headers, versions, injection and XSS. Balanced coverage of the OWASP Top 10 essentials.
- Focused — the high-signal injection families (SQL, command, code, XXE) plus XSS and headers. Skips exotic injection types that rarely apply but dominate scan time.
- Deep — core categories including SSRF, SSTI and IDOR. Thorough, faster than Default.
- Production Safe — non-intrusive GET and HEAD requests and response analysis only; no attack payloads and no state-changing tests. For live production targets. See Production Safe (Passive).
You can also build a custom policy and tick individual checks from the full catalogue.
Policy settings
- Requests / second — Unlimited, 1, 2, 5, 10, 20 or 50 req/s. Applies to the whole scan, including recorded-session replay and quick scans, so the target is throttled no matter how you scan. If you also set a per-request delay, the larger value wins.
- Concurrency — 1, 2, 5, 10, 20, 30 or 50 parallel requests. Default 5.
- Delay — 0 to 5000 ms between requests. Default 0.
- Max payloads / type — All, or cap at 10, 25, 50, 100 or 200 per check. Lowering this trades recall for speed.
- Skip timing-based checks — drops the checks that infer a vulnerability from response delay. Faster, and fewer false positives on a slow or noisy network.
- AI detection — lets the local model look for exposed secrets and personal data the rules miss. Experimental, and requires the AI model to be downloaded.
Attack scope
Two more wildcard boxes, applied to the URLs discovery found:
- Attack include — only fire payloads at URLs matching these, e.g.
*/api/*. Blank means attack everything discovered. - Attack exclude — never attack these. Use it for
*/logout, delete endpoints and downloads. Excluded URLs are still crawled and still appear in the sitemap — they just never receive a payload.
Step 5 — Schedule
Run the scan now, set up recurring runs, or both.
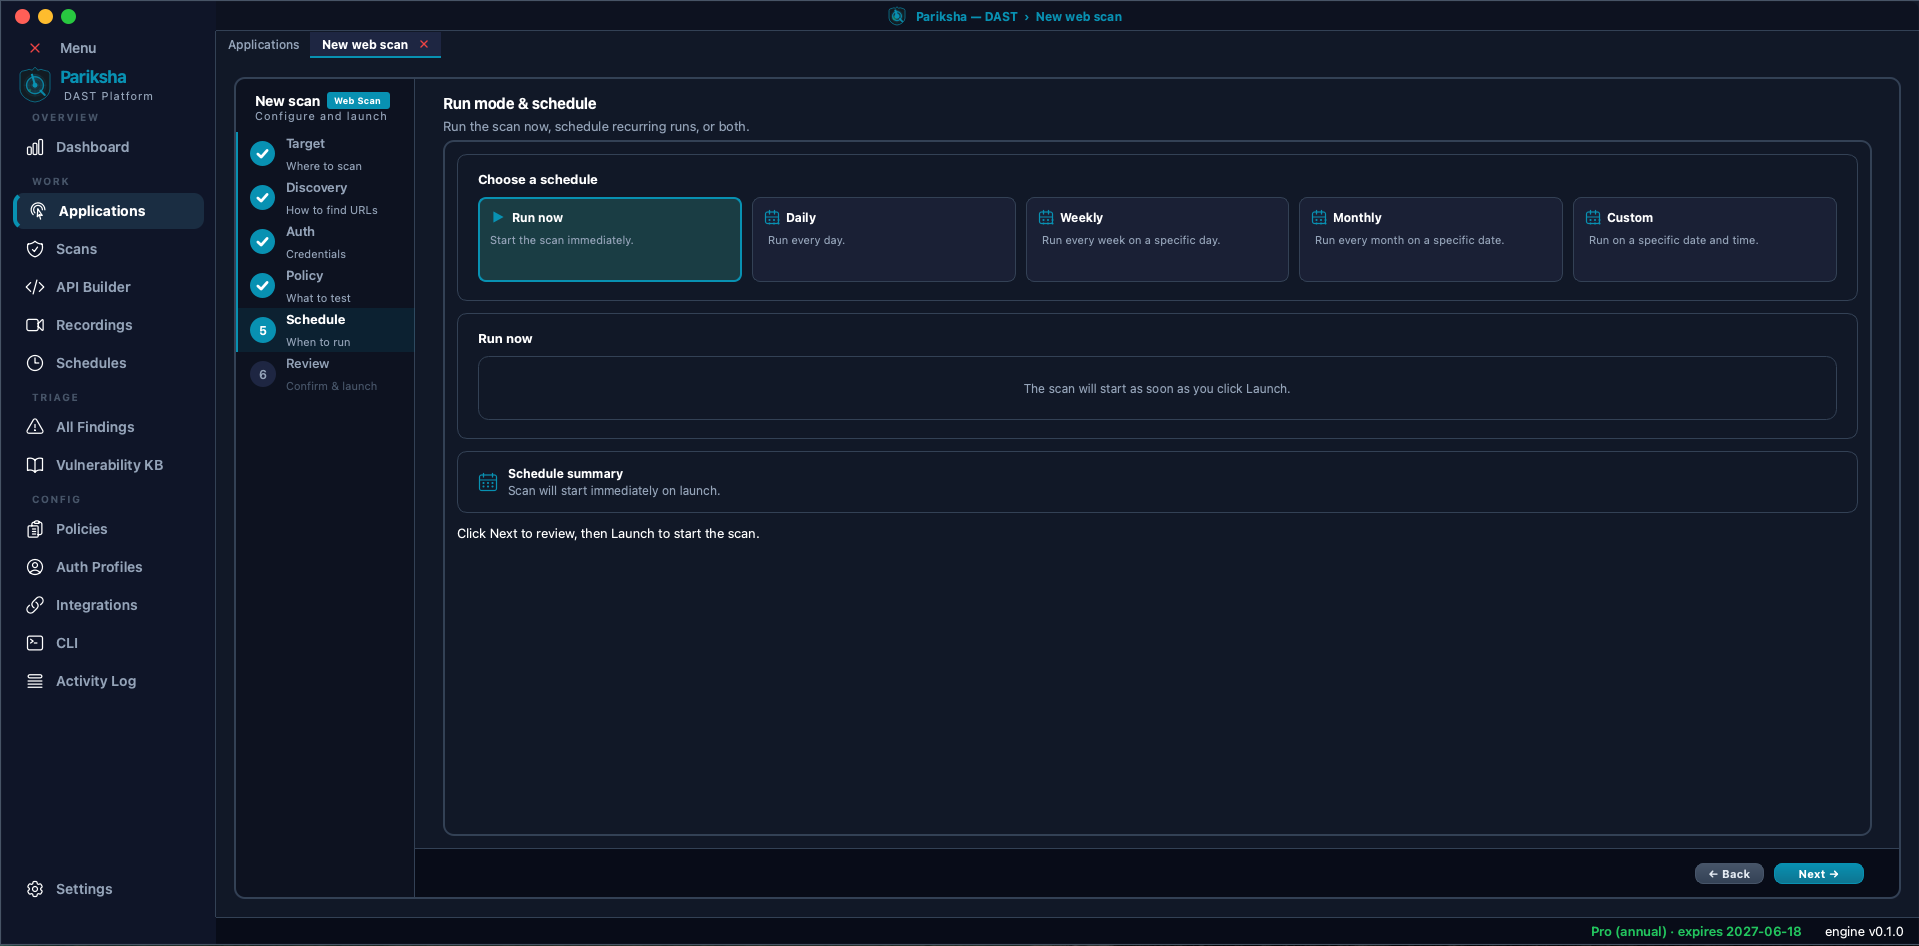
- Run now — the scan starts as soon as you click Launch.
- Daily — run every day at a time you pick.
- Weekly — run every week on a specific day.
- Monthly — run every month on a specific date.
- Custom — run on a specific date and time, or drive it from a full cron expression.
Recurring scans are managed afterwards on the Schedules screen, which also recalculates missed runs — a laptop that was closed overnight will not silently skip a week. See Scheduled Scans.
Step 6 — Review and launch
The final step restates the whole configuration so you can check it before anything is sent.
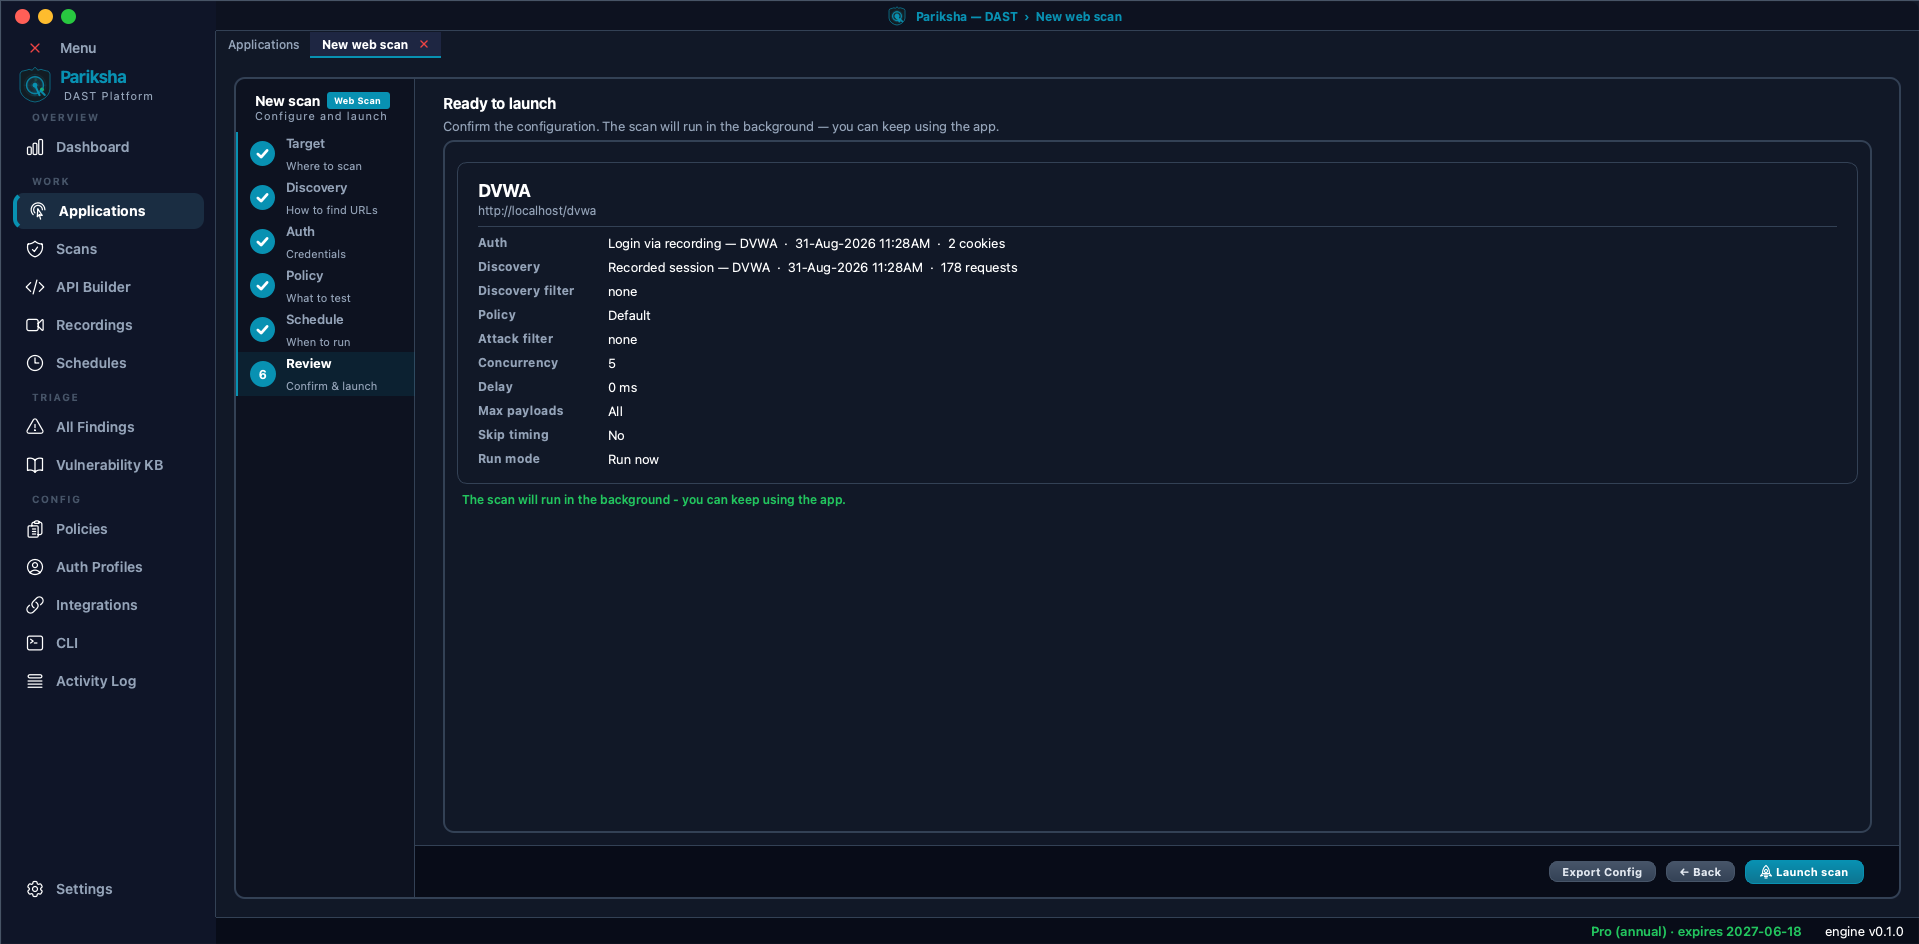
The summary covers the target URL, Auth, Discovery strategy, Discovery filter, Policy, Attack filter, Concurrency, Delay, Max payloads, Skip timing and Run mode. Two buttons matter:
- Launch scan — starts the scan in the background. You can keep using the app: start another scan, triage an older run, or edit an API project while this one runs.
- Export Config — saves the whole configuration as a JSON file you can run headlessly. This is by far the easiest way to build a CI/CD config, because every value is already filled in correctly. See CLI & CI/CD.
What happens next
The scan appears in the Scans list and opens into its own tab with five views — Overview, Findings, Sitemap, Scope and Logs. Reading those, triaging what comes back, and re-testing a fix are covered in Scan Results, Findings & Retest. Turning the result into a PDF or a mapped compliance report is covered in Reports & Compliance.
Application workspaces
Every saved application has its own workspace with Overview, Scans and Findings tabs. Open it from the Applications screen when you want everything about one application in one place, instead of jumping between the global lists. You can start a new scan or a browser recording directly from there.