Installation
Vooki Pro is a desktop DAST application. The scan engine, the vulnerability database, the AI analysis and your findings all run on your own machine — there is no cloud account to create and no scan data goes to a cloud AI. Vooki Pro contacts Vookify only for licensing (see what the licence check sends).
System requirements
| Component | Minimum | Notes |
|---|---|---|
| Operating system | Windows 10 (64-bit) macOS 11 Linux, glibc 2.28 |
Apple Silicon and Intel share one disk image. Linux ships as an AppImage — Ubuntu 20.04+, Debian 11+, Fedora 32+. |
| RAM | 16 GB 32 GB recommended |
ThreatLens' on-device AI model uses roughly 5 GB of RAM during a scan. 16 GB is the minimum supported configuration; 32 GB is recommended for smoother performance on larger targets or when running other applications alongside Vooki Pro. |
| Disk space | 7 GB | 2 GB application, 5 GB AI model. Allow 15 GB of headroom for scan data and reports. |
| Network | Licence checks | Needed to activate the licence and, once, to fetch the model. After that, Vooki Pro re-checks the licence about once a day while online and keeps working offline for about a week after the last successful check. Scanning itself needs no internet access beyond your target. |
Download
Request a 7-day trial — our team will review your request and email you a licence key and installation instructions. Buying an annual licence is handled through Lemon Squeezy, which manages checkout and installer access for your platform. See Get Vooki Pro for both paths.
| Platform | File | Signing |
|---|---|---|
| macOS | Vooki-Pro-<version>.dmg | Signed and notarized |
| Windows | Vooki-Pro-<version>-Setup.exe | Signed installer |
| Linux | Vooki-Pro-<version>-x86_64.AppImage | Self-contained |
Install
Pick your platform. The choice is remembered across every page of the docs.
Open the .dmg and drag Vooki Pro.app into your Applications folder.
On first launch, right-click the app and choose Open so Gatekeeper lets it through.
Double-click the .exe, choose an install location and follow the prompts.
The installer creates a Start Menu entry and a desktop shortcut.
The AppImage is self-contained — there is nothing to install. Mark it executable and run it:
chmod +x Vooki-Pro-<version>-x86_64.AppImage
./Vooki-Pro-<version>-x86_64.AppImage
Keep it anywhere — ~/Applications/ or /opt/ both work.
If the AppImage refuses to start with a FUSE error, install FUSE 2 —
libfuse2 on Ubuntu and Debian, fuse-libs on Fedora. It is no longer
present by default on some newer distributions.
Everything sits under ~/.vooki-pro/ — the project
database, the downloaded AI model, your licence file and crash logs.
Activate your licence
-
Launch Vooki Pro
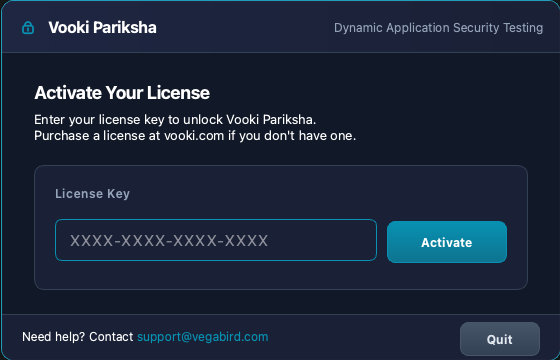
If no licence is present you are asked to activate one. You can also reach this any time from Settings → License.
-
Paste your licence key
Take the key from your order email and click Activate. Vooki Pro contacts the licence server to verify it and stores a signed token on your device. It re-checks about once a day while online, and keeps working offline for about a week after the last successful check.
-
Using it on another machine
Installs are unlimited — a licence is counted in domains, not machines, so just activate the same key on the new one. If you are retiring a machine, open Settings → License there and click Deactivate This Device to remove its activation.
What the licence check sends to Vookify. Activation, the daily re-check and deactivation send: your licence key; a one-way SHA-256 hash of a device fingerprint (built from hostname, CPU, OS, network adapter and hardware ID — the raw identifiers are not sent); the computer’s hostname and OS name and version; the app version; and the signed token issued at activation. Vookify uses these to count installs and support your key. If you assign a domain to your licence, the registrable domain you chose (for example
example.com) is also sent, once. Vookify stores it only as a keyed hash plus an encrypted copy, not in plain text. The licence server also records when each device last checked in. Scan traffic, findings, reports and AI triage are never sent. The one-time AI model download is a separate request to the model host, not a licence call.Vooki Pro re-validates in the background about once a day. If it cannot reach the server it keeps working on the last valid token.
Download the AI model Required
ThreatLens is the local AI analyst. It reviews findings on your machine — demoting likely false positives and spotting exposed secrets and personal data the rule-based checks miss. It is about 5 GB and downloads separately from the installer.
AI analysis is part of every scan. Until the model is present, findings will not carry the triage that Vooki Pro's reports and false-positive handling assume.
Open Settings → AI Model
The tab shows the current state and the download control.
Click Download
The transfer is resumable — if it is interrupted, start it again and it picks up where it left off.
Confirm it landed
The model is saved to
~/.vooki-pro/models/and used from there on. It never sends anything to a remote service.
Verify the install
The bundled CLI reports its version, and the licence state of this machine:
"/Applications/Vooki Pro.app/Contents/MacOS/vooki-pro-cli" --version
"/Applications/Vooki Pro.app/Contents/MacOS/vooki-pro-cli" license status& "C:\Program Files\Vooki Pro\vooki-pro-cli.exe" --version
& "C:\Program Files\Vooki Pro\vooki-pro-cli.exe" license status/opt/vooki-pro-cli/vooki-pro-cli --version
/opt/vooki-pro-cli/vooki-pro-cli license statuslicense status prints the plan, expiry, how many licensed domain slots are in use and
whether CI/CD export is included:
  Status    : active (device activation)
  Plan      : Yearly - 3 Domains
  Expires   : 22 Sep 2027
  Domains   : 1 of 3 used - example.com
  CI/CD export (SARIF): included
The AI model is a separate download, covered above — Settings → AI Model shows whether it is present.
Uninstall
| Platform | How |
|---|---|
| macOS | Drag Vooki Pro.app from Applications to the Trash. |
| Windows | Remove the Vooki Pro entry from Settings → Apps → Installed apps. |
| Linux | Delete the .AppImage file. |
To clear scan history, reports and the downloaded model as well, delete
~/.vooki-pro/.